# Reporters
# Cli
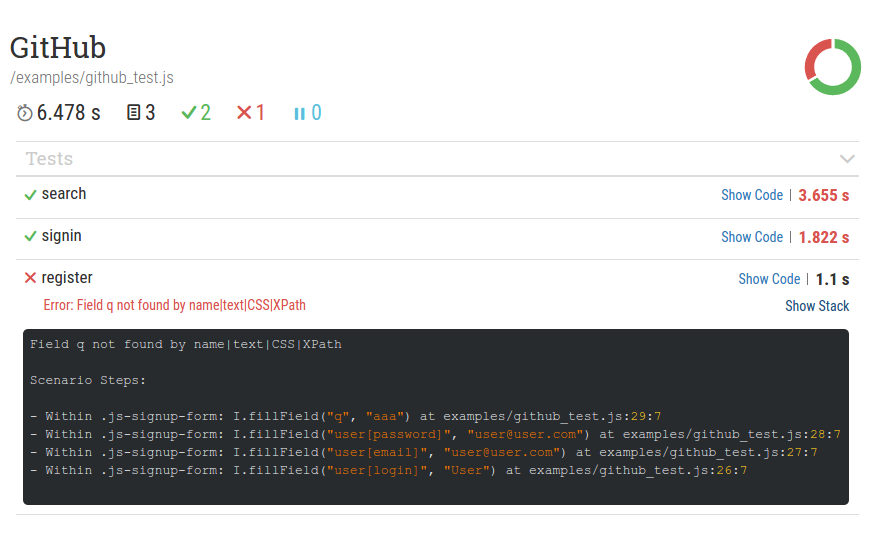
By default, CodeceptJS provides cli reporter with console output. Test names and failures will be printed out on screen.
GitHub --
 ✓ search in 2577ms
 ✓ signin in 2170ms
 ✖ register in 1306ms

-- FAILURES:

  1) GitHub: register:
      Field q not found by name|text|CSS|XPath

  Scenario Steps:

  - I.fillField("q", "aaa") at examples/github_test.js:29:7
  - I.fillField("user[password]", "[email protected]") at examples/github_test.js:28:7
  - I.fillField("user[email]", "[email protected]") at examples/github_test.js:27:7
  - I.fillField("user[login]", "User") at examples/github_test.js:26:7


  Run with --verbose flag to see NodeJS stacktrace
output steps use --steps option:
npx codeceptjs run --steps
Output:
GitHub --
 search
 • I am on page "https://github.com"
 • I am on page "https://github.com/search"
 • I fill field "Search GitHub", "CodeceptJS"
 • I press key "Enter"
 • I see "Codeception/CodeceptJS", "a"
 ✓ OK in 2681ms

 signin
 • I am on page "https://github.com"
 • I click "Sign in"
 • I see "Sign in to GitHub"
 • I fill field "Username or email address", "[email protected]"
 • I fill field "Password", "123456"
 • I click "Sign in"
 • I see "Incorrect username or password.", ".flash-error"
 ✓ OK in 2252ms

 register
 • I am on page "https://github.com"
   Within .js-signup-form:
   • I fill field "user[login]", "User"
   • I fill field "user[email]", "[email protected]"
   • I fill field "user[password]", "[email protected]"
   • I fill field "q", "aaa"
 ✖ FAILED in 1260ms
To get additional information about test execution use --debug option.
npx codeceptjs run --debug
This will show execution steps
as well as notices from test runner. To get even more information with more technical details like error stack traces,
and global promises, or events use --verbose mode.
npx codeceptjs run --verbose
GitHub --
 register
   [1] Starting recording promises
   Emitted | test.before
 > WebDriver._before
   [1] Queued | hook WebDriver._before()
   [1] Queued | amOnPage: https://github.com
   Emitted | step.before (I am on page "https://github.com")
 • I am on page "https://github.com"
   Emitted | step.after (I am on page "https://github.com")
   Emitted | test.start ([object Object])
...
Please use verbose output when reporting issues to GitHub.
# Dry Run
There is a way to list all tests and their steps without actually executing them. Execute tests in dry-run mode to see all available tests:
npx codeceptjs dry-run
Output:
Tests from /home/davert/projects/codeceptjs/examples:

Business rules --
  ☐ do something
Google --
  ☐ test @123
GitHub -- /home/davert/projects/codeceptjs/examples/github_test.js
  ☐ Visit Home Page @retry
  ☐ search @grop
  ☐ signin @normal @important @slow
  ☐ signin2
  ☐ register

  Total: 3 suites | 7 tests

--- DRY MODE: No tests were executed ---
Pass --steps or --debug option as in run command to also get steps and substeps to be printed. In this mode tests will be executed but all helpers and plugins disabled, so no real actions will be performed.
npx codecepjs dry-run --debug
ℹ If you use custom JavaScript code inside tests, or rely on values from
grab*commands, dry-run may produce error output.
# Testomat.io
Testomat.io (opens new window) is a modern test management tool focused on CodeceptJS and created by CodeceptJS team. Testomat.io is commercial SaaS service that can receive run reports from local runs or CI. Out of box Testomat.io supports parallel runs, uploading of screenshots and videos.

😻 Testomat.io is free for small teams, so you can use its reporting features with CodeceptJS.
To receive run reports you should:
- Sign up (opens new window) at Testomat.io
- Create a new "Classical" project (select "BDD" project if you use CodeceptJS in BDD mode)
- Select "Import from Source Code"
- Select "CodeceptJS" as testing framework and JavaScript or TypeScript as a language. If you use BDD select "Gherkin" as language.
- Execute provided command in a terminal with your project. This will be "check-tests" or "check-cucmber" command. It scans all your test files and imports them into Testomat.io. This way all your e2e tests will be visible in one UI.
- After tests are imported, go to Runs tab and select "Setup automated tests".
- Follow the instructions:

- You will need to install
@testomatio/reporterpackage and enable it as a plugin in codeceptjs config:
plugins: {
  testomatio: {
    enabled: true,
    require: '@testomatio/reporter/lib/adapter/codecept',
    apiKey: process.env.TESTOMATIO,
  }
}
- Run tests with
TESTOMATIO=env variable and API key provided by Testomat.io - See the run report is created and updated in realtime.
Testomat.io (opens new window) reporter works in the cloud, so it doesn't require you to install additional software. It can be integrated with your CI service to rerun only failed tests, launch new runs from UI, and send report notifications by email or in Slack, MS Teams, or create issue in Jira.
# ReportPortal
For enterprise grade we reporting we recommend using ReportPortal (opens new window).
ReportPortal (opens new window) is open-source self-hosted service for aggregating test execution reports. Think of it as Kibana but for test reports.
Use official CodeceptJS Agent for ReportPortal (opens new window) to start publishing your test results.
# XML
Use default xunit reporter of Mocha to print xml reports. Provide --reporter xunit to get the report to screen.
It is recommended to use more powerful mocha-junit-reporter (opens new window) package
to get better support for Jenkins CI.
Install it via NPM (locally or globally, depending on CodeceptJS installation type):
npm i mocha-junit-reporter
Additional configuration should be added to codecept.conf.js to print xml report to output directory:
  "mocha": {
    "reporterOptions": {
        "mochaFile": "output/result.xml"
    }
  },
Execute CodeceptJS with JUnit reporter:
codeceptjs run --reporter mocha-junit-reporter
Result will be located at output/result.xml file.
# Html
Best HTML reports could be produced with mochawesome (opens new window) reporter.
Install it via NPM:
npm i mochawesome
If you get an error like this
"mochawesome" reporter not found

invalid reporter "mochawesome"
Make sure to have mocha installed or install it:
npm i mocha -D
Configure it to use output directory to print HTML reports:
  "mocha": {
    "reporterOptions": {
        "reportDir": "output"
    }
  },
Execute CodeceptJS with HTML reporter:
codeceptjs run --reporter mochawesome
Result will be located at output/index.html file.
# Advanced usage
Want to have screenshots for failed tests? Then add Mochawesome helper to your config:
  "helpers": {
    "Mochawesome": {
        "uniqueScreenshotNames": "true"
    }
  },
Then tests with failure will have screenshots.
# Configuration
This helper should be configured in codecept.conf.ts
uniqueScreenshotNames(optional, default: false) - option to prevent screenshot override if you have scenarios with the same name in different suites. This option should be the same as in common helper.disableScreenshots(optional, default: false) - don't save screenshot on failure. This option should be the same as in common helper.
Also if you will add Mochawesome helper, then you will able to add custom context in report:
# addMochawesomeContext
Adds context to executed test in HTML report:
I.addMochawesomeContext('simple string');
I.addMochawesomeContext('http://www.url.com/pathname');
I.addMochawesomeContext('http://www.url.com/screenshot-maybe.jpg');
I.addMochawesomeContext({title: 'expected output',
                         value: {
                           a: 1,
                           b: '2',
                           c: 'd'
                         }
});
# Parameters
contextstring, url, path to screenshot, object. See this (opens new window)
# Multi Reports
Want to use several reporters in the same time? Try to use mocha-multi (opens new window) reporter
Install it via NPM:
npm i mocha-multi
Configure mocha-multi with reports that you want:
  "mocha": {
    "reporterOptions": {
      "codeceptjs-cli-reporter": {
        "stdout": "-",
        "options": {
          "verbose": true,
          "steps": true,
        }
      },
      "mochawesome": {
        "stdout": "./output/console.log",
        "options": {
          "reportDir": "./output",
          "reportFilename": "report"
        }
      },
      "mocha-junit-reporter": {
        "stdout": "./output/console.log",
        "options": {
          "mochaFile": "./output/result.xml",
          "attachments": true //add screenshot for a failed test
        }
      }
    }
  }
Execute CodeceptJS with mocha-multi reporter:
npx codeceptjs run --reporter mocha-multi
This will give you cli with steps in console and HTML report in output directory.
# Testrail
Testrail integration with CodeceptJS is now so seamless. The test run is created automatically afterwards. The screenshots of failed tests are also attached to test results.
Try to use codeceptjs-testrail (opens new window) plugin
Install it via NPM:
npm i codeceptjs-testrail --save

Now there is new feature, add the configuration to test run of test plan

# Tesults
Submit test results data from CodeceptJS to Tesults (opens new window) easily with the codeceptjs-tesults (opens new window) plugin. Test results data is submitted automatically after a test run completes.
npm i codeceptjs-tesults --save
Once installed, follow the quick and easy integration instructions (opens new window) to get setup in no time.