Testing with AI
CodeceptJS is the first open-source test automation framework with AI features to improve the testing experience. CodeceptJS uses AI provider like OpenAI or Anthropic to auto-heal failing tests, assist in writing tests, and more…
Think of it as your testing co-pilot built into the testing framework
This is guide on using AI features inside CodeceptJS. To control CodeceptJS via AI Agents, see Agentic Testing Guide.
How AI Improves Automated Testing
Section titled “How AI Improves Automated Testing”LLMs like ChatGPT can technically write automated tests for you. However, ChatGPT misses the context of your application so it will guess elements on page, instead of writing the code that works.
CodeceptJS can share the testing context with AI provider when asked questions about a test.
So, instead of asking “write me a test” it can ask “write a test for this page”. GPT knows how to write CodeceptJS code, how to build good-looking semantic locators and how to analyze HTML to match them. Even more, GPT suggestions can be tested in real-time in a browser, making a feedback loop.
CodeceptJS AI can do the following:
- 🏋️♀️ assist writing tests in
pause()or interactive shell mode - 🚑 self-heal failing tests (can be used on CI)
How it works
Section titled “How it works”As we can’t send a browser window with ChatGPT we are not be able to fully share the context. But we can chare HTML of the current page, which is quite enough to analyze and identify if a page contains an element which can be used in a test.
AI providers have limits on input tokens but HTML pages can be huge. However, some information from a web page may be irrelevant for testing. For instance, if you test a blog, you won’t need text contents of a post, as it can’t be used in locators. That’s why CodeceptJS sends HTML with all non-interactive HTML elements removed. So, only links, buttons, fields, etc will be sent to AI as a context. In case you have clickable <div> but with no role="button" it will be ignored. Also, we minify HTML before sending.
Even though, the HTML is still quite big and may exceed the token limit. So we recommend using models with at least 16K input tokens, (approx. 50K of HTML text), which should be enough for most web pages. It is possible to strictly limit the size of HTML to not exceed tokens limit.
❗AI features require sending HTML contents to AI provider. Choosing one may depend on the descurity policy of your company. Ask your security department which AI providers you can use.
Set up AI Provider
Section titled “Set up AI Provider”CodeceptJS uses Vercel AI SDK to connect to different AI providers. To enable AI features, add an ai section to your codecept.conf file with a configured model.
Quick Start
Section titled “Quick Start”Install the AI SDK and your preferred provider package:
npm install ai @ai-sdk/openai# ornpm install ai @ai-sdk/anthropicThen configure the model in your codecept.conf.js:
import { openai } from '@ai-sdk/openai'
export default {  // ... other config  ai: {    model: openai('gpt-5'),  },}
Once AI provider is configured run tests with --ai flag to enable AI features
npx codeceptjs run --aiBelow we list sample configuration for popular AI providers
OpenAI GPT
Section titled “OpenAI GPT”Install the OpenAI provider:
npm install @ai-sdk/openaiSet your API key as environment variable:
export OPENAI_API_KEY=your-api-keyConfigure in codecept.conf.js:
import { openai } from '@ai-sdk/openai'
export default {  ai: {    model: openai('gpt-5'),    // or use gpt-4o, gpt-3.5-turbo, etc.  },}
Anthropic Claude
Section titled “Anthropic Claude”Install the Anthropic provider:
npm install @ai-sdk/anthropicSet your API key as environment variable:
export ANTHROPIC_API_KEY=your-api-keyConfigure in codecept.conf.js:
import { anthropic } from '@ai-sdk/anthropic'
export default {  ai: {    model: anthropic('claude-sonnet-4-6'),    // or use claude-opus-4-7, claude-haiku-4-5, etc.  },}
Google Gemini
Section titled “Google Gemini”Install the Google provider:
npm install @ai-sdk/googleSet your API key as environment variable:
export GOOGLE_GENERATIVE_AI_API_KEY=your-api-keyConfigure in codecept.conf.js:
import { google } from '@ai-sdk/google'
export default {  ai: {    model: google('gemini-1.5-flash'),    // or use gemini-1.5-pro, gemini-2.0-flash-exp, etc.  },}
Other Providers
Section titled “Other Providers”The AI SDK supports 20+ providers including:
- xAI (Grok):
npm install @ai-sdk/xai - Mistral:
npm install @ai-sdk/mistral - Groq:
npm install @ai-sdk/groq - Cohere:
npm install @ai-sdk/cohere - Azure OpenAI:
npm install @ai-sdk/azure
See AI SDK Providers for complete list and configuration details.
Self-Healing Tests
Section titled “Self-Healing Tests”In large test suites, the cost of maintaining tests goes exponentially. That’s why any effort that can improve the stability of tests pays itself. That’s why CodeceptJS has concept of heal recipes, functions that can be executed on a test failure. Those functions can try to revive the test and continue execution. When combined with AI, heal recipe can ask AI provider how to fix the test. It will provide error message, step being executed and HTML context of a page. Based on this information AI can suggest the code to be executed to fix the failing test.
AI healing can solve exactly one problem: if a locator of an element has changed, and an action can’t be performed, it matches a new locator, tries a command again, and continues executing a test. For instance, if the “Sign in” button was renamed to “Login” or changed its class, it will detect a new locator of the button and will retry execution.
You can define your own heal recipes that won’t use AI to revive failing tests.
Heal actions **work only on actions like click, fillField, etc, and won’t work on assertions, waiters, grabbers, etc. Assertions can’t be guessed by AI, the same way as grabbers, as this may lead to unpredictable results.
If Heal plugin successfully fixes the step, it will print a suggested change at the end of execution. Take it as actionable advice and use it to update the codebase. Heal plugin is supposed to be used on CI, and works automatically without human assistance.
To start, make sure AI provider is connected, and heal recipes were created by running this command:
npx codeceptjs generate:healHeal recipes should be included into codecept.conf.js or codecept.conf.ts config file:
import './heal.js'
export const config = {  // ... your codeceptjs config
Then enable heal plugin:
plugins: { heal: { enabled: true }}If you run tests in AI mode and a test fails, a request to AI provider will be sent
npx codeceptjs run --ai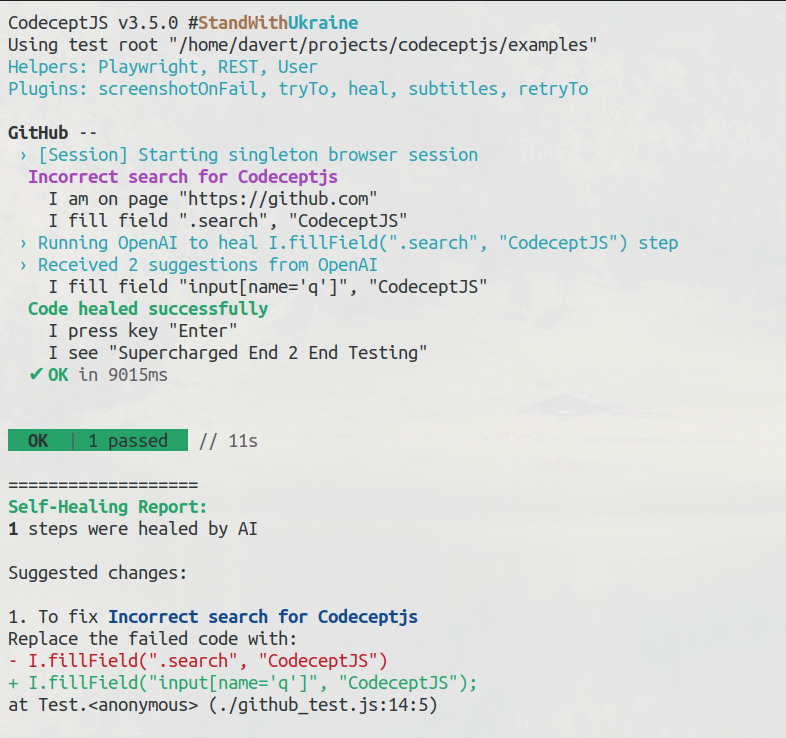
When execution finishes, you will receive information on token usage and code suggestions proposed by AI. By evaluating this information you will be able to check how effective AI can be for your case.
Analyze Results
Section titled “Analyze Results”When running tests with AI enabled, CodeceptJS can automatically analyze test failures and provide insights. The analyze plugin helps identify patterns in test failures and provides detailed explanations of what went wrong.
Enable the analyze plugin in your config:
plugins: { analyze: { enabled: true, // analyze up to 3 failures in detail analyze: 3, // group similar failures when 5 or more tests fail clusterize: 5, // enable screenshot analysis (requires modal that can analyze screenshots) vision: false }}When tests are executed with --ai flag, the analyze plugin will:
Analyze Individual Failures: For each failed test (up to the analyze limit), it will:
- Examine the error message and stack trace
- Review the test steps that led to the failure
- Provide a detailed explanation of what likely caused the failure
- Suggest possible fixes and improvements
Sample Analysis report:
When analyzing individual failures (less than clusterize threshold), the output looks like this:
🪄 AI REPORT:--------------------------------→ Cannot submit registration form with invalid email 👀
* SUMMARY: Form submission failed due to invalid email format, system correctly shows validation message* ERROR: expected element ".success-message" to be visible, but it is not present in DOM* CATEGORY: Data errors (password incorrect, no options in select, invalid format, etc)* STEPS: I.fillField('#email', 'invalid-email'); I.click('Submit'); I.see('.success-message')* URL: /register
The 👀 emoji indicates that screenshot analysis was performed (when
vision: true).
Cluster Similar Failures: When number of failures exceeds the clusterize threshold:
- Groups failures with similar error patterns
- Identifies common root causes
- Suggests fixes that could resolve multiple failures
- Helps prioritize which issues to tackle first
Categorize Failures: Automatically classifies failures into categories like:
- Browser/connection issues
- Network errors
- Element locator problems
- Navigation errors
- Code errors
- Data validation issues
- etc.
Clusterization output:
🪄 AI REPORT:_______________________________
## Group 1 🔍
* SUMMARY: Element locator failures across login flow* CATEGORY: HTML / page elements (not found, not visible, etc)* ERROR: Element "#login-button" is not visible* STEP: I.click('#login-button')* SUITE: Authentication* TAG: @login* AFFECTED TESTS (4):    x Cannot login with valid credentials    x Should show error on invalid login    x Login button should be disabled when form empty    x Should redirect to dashboard after login
## Group 2 🌐
* SUMMARY: API timeout issues during user data fetch* CATEGORY: Network errors (server error, timeout, etc)* URL: /api/v1/users* ERROR: Request failed with status code 504, Gateway Timeout* SUITE: User Management* AFFECTED TESTS (3):    x Should load user profile data    x Should display user settings    x Should fetch user notifications
## Group 3 ⚠️
* SUMMARY: Form validation errors on registration page* CATEGORY: Data errors (password incorrect, no options in select, invalid format, etc)* ERROR: Expected field "password" to have error "Must be at least 8 characters"* STEP: I.see('Must be at least 8 characters', '.error-message')* SUITE: User Registration* TAG: @registration* AFFECTED TESTS (2):    x Should validate password requirements    x Should show all validation errors on submit
If vision: true is enabled and your tests take screenshots on failure, the plugin will also analyze screenshots to provide additional visual context about the failure.
The analysis helps teams:
- Quickly understand the root cause of failures
- Identify patterns in failing tests
- Prioritize fixes based on impact
- Maintain more stable test suites
Run tests with both AI and analyze enabled:
npx codeceptjs run --aiAdvanced Configuration
Section titled “Advanced Configuration”AI prompts and HTML compression can be configured inside ai section of codecept.conf file:
ai: {  // configure AI model (required)  model: openai('gpt-4o-mini'),
  // redefine prompts  prompts: {    // {}  },  // how to process HTML content  html: {    // {}  }  // limit the number of tokens to be  // used during one session  maxTokens: 100000}
Customizing Prompts
Section titled “Customizing Prompts”CodeceptJS uses three main prompts for AI features:
healStep- suggests fixes for failing tests
To customize a prompt, generate it using:
npx codeceptjs generate:prompt <promptName># or use aliasnpx codeceptjs gp <promptName>For example, to customize the heal step prompt:
npx codeceptjs generate:prompt healStepThis creates prompts/healStep.js file in your project root:
export default (html, { step, error, prevSteps }) => { return [ { role: 'user', content: `As a test automation engineer I am testing web application using CodeceptJS. I want to heal a test that fails. Here is the list of executed steps: ${prevSteps.map(s => s.toString()).join(', ')} Propose how to adjust ${step.toCode()} step to fix the test. Use locators in order of preference: semantic locator by text, CSS, XPath. Use codeblocks marked with \`\`\` Here is the error message: ${error.message} Here is HTML code of a page where the failure has happened: \n\n${html}`, }, ]}Modify this prompt to fit your needs. CodeceptJS will automatically load custom prompts from the prompts/ directory when AI features are enabled.
You can also override prompts programmatically in config:
ai: { prompts: { healStep: (html, { step, error, prevSteps }) => [{ role: 'user', content: 'As a test engineer...' }] }}HTML is processed before sending it to GPT to reduce the number of tokens used. You may need to adjust default settings to work with your application. For instance, the default strategy may remove some important elements, or contrary keep HTML elements that have no use for test automation.
Here is the default config:
ai: { html: { maxLength: 50000, simplify: true, minify: true, interactiveElements: ['a', 'input', 'button', 'select', 'textarea', 'option'], textElements: ['label', 'h1', 'h2'], allowedAttrs: ['id', 'for', 'class', 'name', 'type', 'value', 'tabindex', 'aria-labelledby', 'aria-label', 'label', 'placeholder', 'title', 'alt', 'src', 'role'], allowedRoles: ['button', 'checkbox', 'search', 'textbox', 'tab'], }}maxLength: the size of HTML to cut to not reach the token limit. 50K is the current default but you may try to increase it or even set it to null.simplify: should we process HTML before sending to GPT. This will remove all non-interactive elements from HTML.minify: should HTML be additionally minified. This removed empty attributes, shortens notations, etc.interactiveElements: explicit list of all elements that are considered interactive.textElements: elements that contain text which can be used for test automation.allowedAttrs: explicit list of attributes that may be used to construct locators. If you use specialdata-attributes to enable locators, add them to the list.allowedRoles: list of roles that make standard elements interactive.
It is recommended to try HTML processing on one of your web pages before launching AI features of CodeceptJS.
To do that open the common page of your application and using DevTools copy the outerHTML of <html> element. Don’t use Page Source for that, as it may not include dynamically added HTML elements. Save this HTML into a file and create a NodeJS script:
import { removeNonInteractiveElements } from 'codeceptjs/lib/html'import fs from 'fs'
const htmlOpts = {  interactiveElements: ['a', 'input', 'button', 'select', 'textarea', 'label', 'option'],  allowedAttrs: ['id', 'for', 'class', 'name', 'type', 'value', 'aria-labelledby', 'aria-label', 'label', 'placeholder', 'title', 'alt', 'src', 'role'],  textElements: ['label', 'h1', 'h2'],  allowedRoles: ['button', 'checkbox', 'search', 'textbox', 'tab'],}
html = fs.readFileSync('saved.html', 'utf8')const result = removeNonInteractiveElements(html, htmlOpts)
console.log(result)
Tune the options until you are satisfied with the results and use this as html config for ai section inside codecept.conf file.
It is also recommended to check the source of removeNonInteractiveElements and if needed propose improvements to it.
For instance, if you use data-qa attributes to specify locators and you want to include them in HTML, use the following config:
{ // inside codecept.conf.js ai: { html: { allowedAttrs: ['data-qa', 'id', 'for', 'class', 'name', 'type', 'value', 'aria-labelledby', 'aria-label', 'label', 'placeholder', 'title', 'alt', 'src', 'role'] } }}Debugging
Section titled “Debugging”To debug AI features run tests with DEBUG="codeceptjs:ai" flag. This will print all prompts and responses from AI provider
DEBUG="codeceptjs:ai" npx codeceptjs run --aior if you run it in shell mode:
DEBUG="codeceptjs:ai" npx codeceptjs shell --ai